 Web Based On Demand Code Free
|
What Is Data Façade?
Who is it for?
Download
Data Façade Architecture
Data Façade in Action
User guide
Tutorial
F.A.Q
Blog
Contact Us
|
User Guide: Getting StartedLogin to Data Façade After installing Data façade, you can access the configuration pages via Internet explorer on the following url http://<host>:<port>/WebDB e.g. http://localhost:8080/WebDB 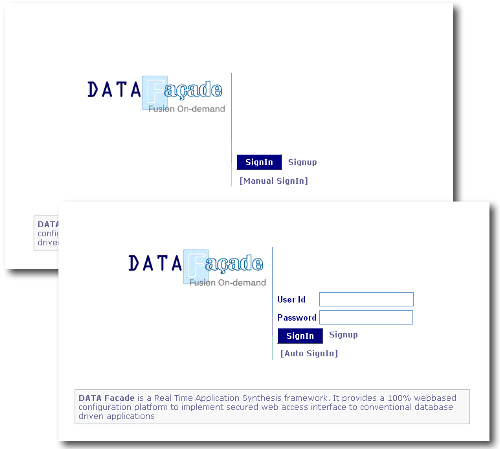 The login page will appear. Select Manual Login, and enter the user id and password. Note: Automatic Sign In is for NTLM enabled systems. For the 1st time login use the built in admin account. User Id: admin Password: Go4Gold Note: After Initial login please change the admin password to some thing else Creating/Managing Roles
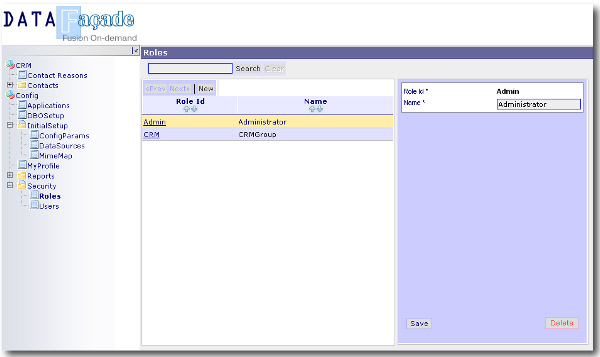
1. Login to Data Façade using an "Admin" account. Select Config->Security->Roles from the tree menu on left hand side.
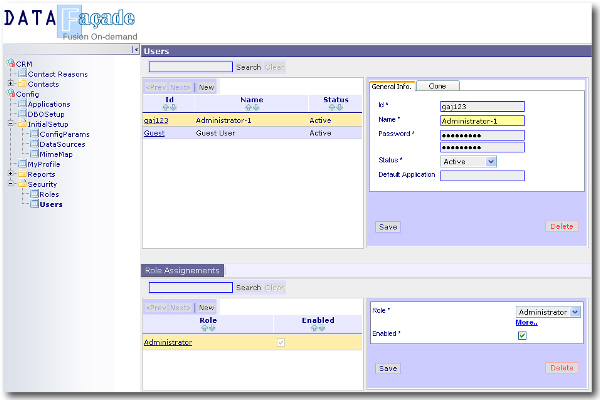
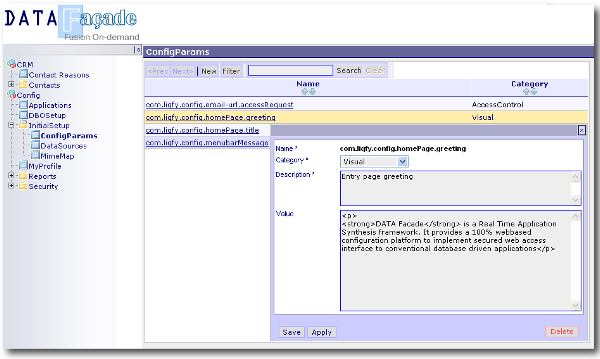
1. Select Config->Security->Users Certain Configuration parameters are used by built-in features of Data Façade. They you can add new configuration parameters to be later used by custom "Actions" 1. Select Config->Initial Setup->Config Params. "ConfigParams" page will be displayed. Pick a parameter to be modified, or add a new parameter by clicking "New" Note: There are few built in parameter
 Configuring Data Sources
Data Sources represent the database connections of the data exposed by Data Façade. You can have any number of data sources defined. During Creation of DB Objects, you will be specifying "Primary" table of any of the listed Data Sources here. Data Facade can access any database which has the JDBC (fully compliant) driver. Out of the box Data Facade ships Oracle, MS SQL Server, DB2 and JDBC-ODBC bridge. For any other database, please copy the appropriate driver jar files to the tomcat classpath (i.e. common\lib) of the Data Façade home.
3. Click "Meta Data/Test" button to test the connection. If successful you will see a list of objects (Tables/Views etc) available in the data source. You can further investigate the metadata data by selecting table objects (checking the check boxes) and clicking next. User Guide: ApplicationsData Façade hosts multiple applications. Each application consists of multiple DBObjects providing CRUD capability to underlying database tables and reports. Applications are declared by the administrator. Application logically groups related DBObjects and reprots together. Each Application entry is visible to end users (provided that they have rights) as a "Root" point in the Left hand side menu. When DBOjects or reports are configured the relative menu path is specified. Managing Applications 1. Login as an Administrator. 2. From the main "Tree" menu, select "Config->Applications". List of applications will be listed at the main panel. 3. Select the application you want to manage. The application details will be displayed at the details panel to the right. 4. Click the "DBObjects" link to open up a list of DBOBjects associated with the application. 5. Alternatively you may click "New" to create new Applications. 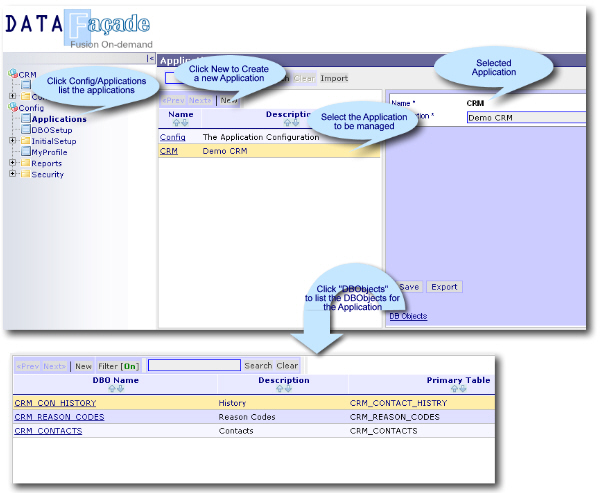 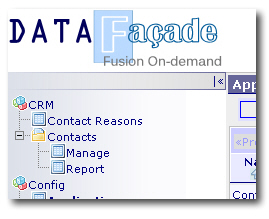 Applications and their components are listed in the main menu. User Guide: DB ObjectsDBObjects are the core visual components of Data Façade. They provide web based CRUD interfaces to database tables. A DBObject (along with it's child components; DBColumns & Actions) represents visual and behavioural aspects of data entities. NOTE: Management and Configuration of various elements (e.g. DataSources, Users, Roles, Reports, DBObjects) of DataFacade are DBOBjects them selves. We have used the rich featureset of DBObjects to boot-strap it self. Managing DBObjects 1. Login as an Administrator. 2. From the main "Tree" menu, select "Config->Applications". List of applications will be listed at the main panel. 3. Select the application you want to manage. The application details will be displayed at the details panel to the right. 4. Click the "DBObjects" link to open up a list of DBObjects associated with the application. The list will pop-up in a new window. 5. Select the DBObject to be managed or Click "New" to create a new DB Object. 6. After modifying the properties click "Save" to save the changes. DBObject Properties and their behaviour Once you select a DBObject to edit (or click "New" to create), the properties of the DBObject will be listed on several "Tabs" as shown below. The tabs are logical grouping of related properties. You can hover the mouse on most of the property names to see a "ToolTip" DBO Name A unique name given to the DB OBject. This can only be specified during the creation of the DB Object. Name should be less than 255 characters. Description Textual description of the DB Object. Must be less than 255 characters. Connection Name Select the Data Source hosting the database table to be CRUD enabled. These Connections are defined under; Config->IntialSetup->DataSources from the main tree menu on the left. Primary Table Select the Database table to be CRUD enabled. Note: System assumes the user account provided for the DataSource has sufficient rights to perform the read/write operations on this table Date Format Default date format for the Date fields in this table. Note: Format is specified in Java style Date/Time formats Page Size Number of records to be displayed in a single page when browsing. Note: Specify -1 to show all the matching records. However this is discouraged for large tables (i.e. >1000 records) Keys List of Keys (seperated by |) uniquely identifying individual records of the table. Sort Columns Column names to be used for Sorting (seperated by |). You may use SQL sort modifire "DESC" to sort in descending order. Insertable Check this box to allow users to create new records in the primary table. Delete Check this box to allow users to delete records in the primary table. Cascade Delete Check this box to delete the records from child DB Objects having Child-Parent relationship to this DB Object, when a record is deleted. Clonable Check this box to allow users to create new record by cloning the current record. Note: User will have to provide new key values as prompted. Print Preview Check this box to allow users generate a Printer Friendly view of the selected record and it's child data entities. onLoad You can specify a Java (BeanShell) script to perform some custom tasks when record is loaded. Implicit variable DB_RECORD can be used to access the data that was loaded (see the APIs of DBRecord). onSave You can specify a Java (BeanShell) script to perform some custom tasks when record is saved. Implicit variable DB_RECORD can be used to access the data that was loaded (see the APIs of DBRecord). onDelete You can specify a Java (BeanShell) script to perform some custom tasks when record is deleted. Implicit variable DB_RECORD can be used to access the data that was loaded (see the APIs of DBRecord). Children display mode Specify how the child records are displayed. This property is only applicable for DBObjects that specified as children to another DBObject. Following samples shows results of each option (i.e. Cascade,Popup,In-Line Popup,Hidden) of this property.
Cascade Shows the children records in the same page as a cascaded panel. 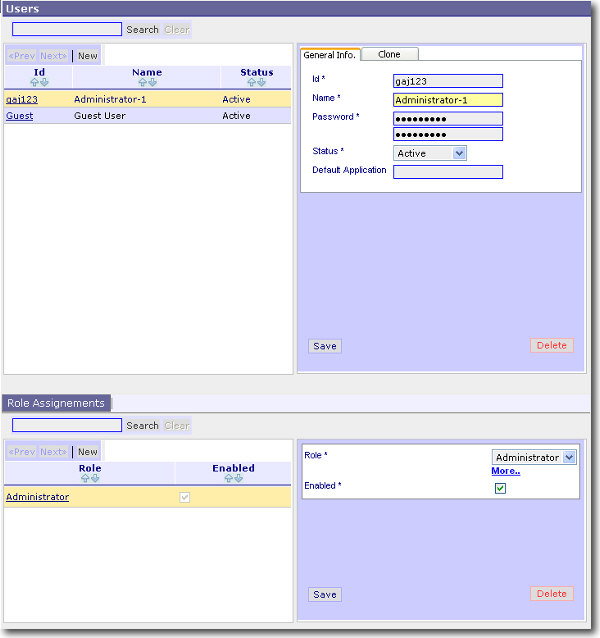
Popup Pops up a new Browser window showing the children records. 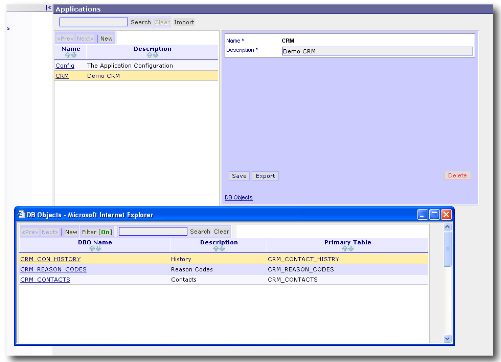
In-Line Popup Pops up an in-line window showing the children records. 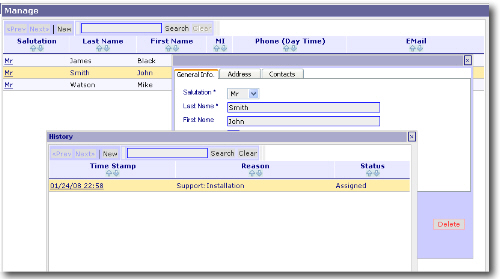
Hidden
This is a special situation where child db objects are hidden, yet associated with the parent DB so that Cascaded Deletes or any custom functions can be trickle down to child DBObjects. Record display mode Specify how the selected record (or new record to be created) is displayed. Following samples shows results of each option (i.e. RHS,Popup & In-Line) of this property.
RHS (Right Hand Side) Selected record is displayed on the right side of the browsing area. 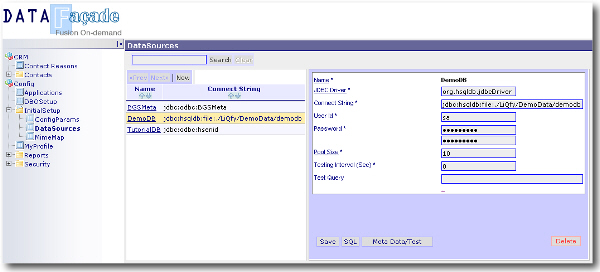
Popup Selected record is shown in a new new Browser window. 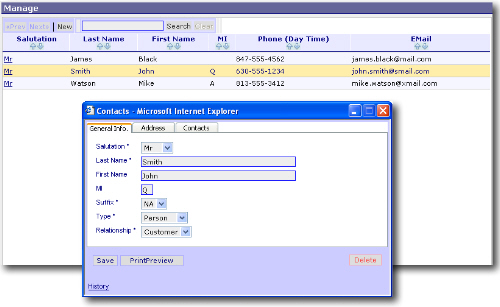
In-Line Selected Record is displayed as an in-line popup window (within the same browser window/frame). Record Search mode Specify how the records are searched/browsed.
Browse Shows the records as browsable table. 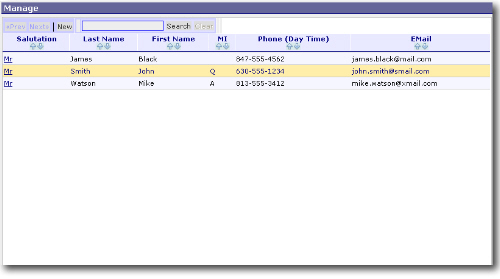
List Shows record in a list as shown below. Prefered for situations where lot of data to be listed for each record. 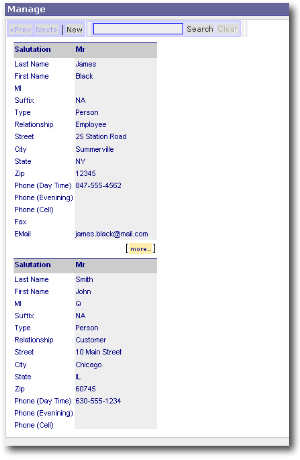
TreeView Shows record in a tree view. Tree strctures is determined by the Sort Field(s). Each entry in the Sort field should have the following format <level1>[:<level2>]...[:<<leveln>]. You can add an "Artificial" column (to the DBObject) that would result data in this format. e.g. Billing:Error Billing:Explanation Billing:Info Support:Feature Use Support:Installation Support:Product Defect Updates:Address Change Updates:Email Updates:Phone Number Above data may be generated by combining two SQL Columns MAJOR_CATEGORY || ':' || MINOR_CATEGORY 
Key Search Directly loads the record that matches the key value from a parent record. Used to show data from tabes with 1 to 1 releationships.
Search/Browse Shows a blank page with search, and once the search is perfomed matching records will be listed for browsing. Good for larger tables where browsing for records (without filtering) is not practical and/or useful. e.g. Large customer population. 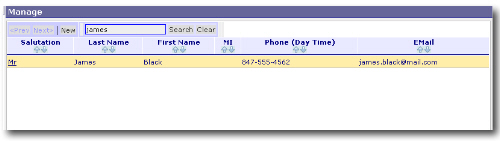 Height Height of the data browsing area in pixels Detail Panel Height Height of the Detailed Panel where the record details (for the selected record) are displayed. Note: This property is ineffective if the Record Display Mode is RHS Detail Panel Width Width of the Detailed Panel where the record details (for the selected record) are displayed. List Panel Width Width of the List (browsing) Panel where the records are displayed. Note: If the record display mode is InLine, this width should be > Detail Panel Width Window Height Height of the new Browser Window created to display records. Only applicable when Children display mode is "Popup". Menu Path Menu Path to be show in the Main Tree Menu on the left to access this DBObject. This is a relative path, having application name as the base. Note: For Child DBObjects (i.e. the DBOjects that will be listed as a Children in another DB Object) this property should be left blank. Help File You can upload a document (preferably a PDF or self containd HTML) which would be a online help/guideline for the end users using this DBObject. If a help file is specified, a "Help" button will appear on the top tool bar, that would open the file you specify when clicked. Roles Roles can be specified to restrict access to the DBObjects. Available options can be listed by hovering the mouse on the "eclipse" right above the Roles Text area. Each Roles optionally followed by it's access level are listed here in each row. e.g. Admin CRM::R,L Above entry means, Admin Role has full access and CRM Role has (R)ead and (L)ist access. User Guide: DB ColumnsDBColumns represents the visual aspects of the columns of underlying database table (the primary table associated with the DBObject). Based on the data type, enumeration and the formats, Data Façade automatically displays appropriate contorls to the end user. They also have built in validation functions such as data type validations and have provisions for custom client side validation thru java script snipets. Usually a DBColumn is directly mapped to a column on the primary table. However there are situations where "Artificial" DBColunns mapping to a computed field (e.g. Concatination). Managing DBColumns 1. Open the DBObject to be managed (or Create a new DBObject and save changes). 2. Click the "Columns" link to open the list of Columns. 3. For each Column listed modify necessary properties by providing appropriate values. Make sure you save the record before moving to the next. DBColumn Properties and their behaviour Once a column is selected to be modified, properties associated with it are shown in multiple tabs as shown below. Demo/Tryout field edit window Name Column name. During the Creation of the DBObject this value is auto populated. However you may change it to a calculated field. Description This will be displayed to enduser as a the label for the field. Default is the Column name it self. SQL Type Select the Data Type. This is also auto populated during DBObject creation. Lookup Lookp is an optional field to specify a list of values to the end user. When a lookup is specified end user will see a "Drop Down" or a "Combo Box". A Drop Down will be shown if this field is NOT Nullable. Otherwise a Combo Box will be shown. There are three ways to specify a lookup
1. Specify "Enum" : This will pick the valid list of values from the "Enumeration" property. Please se "Enumeration" property for details.
NOTE: You can see these options and copy a "template" of them to this field by hovering the mouse over the "eclipse" on the left/top corner of the input field, and then click on any of the values (You can try it on the demo field edit window shown above).
2. Specify a SQL Query: The SQL Query should be in stated in the following format.
SQL::<ConnectionName>SELECT <valueField>,<descriptionField> FROM <tableName>
3. Specify another DBIbject: This will pick the valid list of values from another DBObject and use the "KeyField(s)" of that DBObject as the list of values. This also provides a link in the user interface so that user can drill down in to the selected value.e.g. SQL::DemoDB::SELECT REASON_CODE,REASON FROM CRM_REASON_CODES ORDER BY REASON
DBO::<DBOName>
e.g. DBO::CONTACT_REASONS Default Expression A Java Expersion that would result a "default" value for this field. You may specify a fixed string using double quotes (e.g. "My Default"). Some other usefull values are
com.bgs.util.UniqueKeyGenerator.genKey() : Generates a unique key; useful for key fields.
Note: There are short forms listed in the guide box that pops up when you hover the mouse on the top/left corner of the field (You can try it on the demo field edit window shown above).(new java.util.Date()) : Defaults the value to current system time; useful for note entries, transactions etc. com.bgs.db.SessionContext.getSessionContext().getUser().getId(): Defaults to the user id of the logged in user; useful for auditing/tracking com.bgs.db.SessionContext.getSessionContext().getUser().getName(): Defualts to the name of the user logged in Validator A custom Java Script to perform client (Browser) side validation. There are few convenience built in java script functions that can be utilized in this script to reduce the coding effort.
getElement('<field_name>'):Returns the Element speficified by the field_name
Note: There are short forms listed in the guide box that pops up when you hover the mouse on the top/left corner of the field (You can try it on the demo field edit window shown above).valueOf('<field_name>'):Returns the text value of the Element specified by field_name callAction('<action_name>'):Calls an Action (See Validation actions under the "Actions" section) on the server side. Returns the results (string) sent by the validation action. setList('<field_name>',<value_array>,<text_array>):Sets the list of values on a Drop Down or Combo box with the provided value_array and text_array. These arrays would typically be derived from the data retuned from a server side validation action invoked by "callAction" function. trim(<string>): Trims the provided String Enumeration Provides a vay to specify a "Fixed" list of values for the field. The enduser exprience is two fold. If Enumeration values are provided and "Enum" is specified in the "Lookup" property, it will show a Combo Box or a Drop down. If the "Lookup" proprty is blank, it'll show a list of "Radio Buttons" to pick. Enter enumeration in following formats 1. key1::value1|key2::value2 2. value1|value2 Foreign Key Used when this DBObject is a child of a parent DBObject. Specify the name of the Foreign Key field of the Parent DBObject relating to this DB object. Format Format of the field. Format can be specified in different ways and based on that the control shown to the end user will be different.
1. Java (Text package) style formatting
Eg MM/dd/yyyy ###,##0.00 2. For Large strings with multiple rows, x:<cols>X<rows> Eg. x:60X10 3. For long single row strings, x:<size> Eg. x:40 4. For dual formats use format_string1..formatString_2, Eg. x:40..x:60X10
Note: Dual Format displays the a text control based on the 1st format and provide an "eclipse" on the right side that would open another control
based on the 2nd format upon clicking. This is useful when the realestate is limited show a larger text area, you can specify smaller text format as the 1st format and a larger text format for the 2nd. This technique is used in the Column definition it self, see "Remarks/Tooltips" field on the above "Demo/Tryout field edit window". Click the eclipse on the right to expand the larger text control.
Group Group provides a way to logically group fields in to different tabs when they are show to the end user. Each unique group name specified in the list of columns shows a seperate Tab to the end users. If a group name is not specofiec for certain columns (and group names are specified to some others) those columns without group names will be automatically assigned a defualt tab "General Info". Note: Order of the tabs are decided by the "Display Order" of the columns in the group.
E.g. Columns A,B,C have display orders of 0,5,3 and belongs to Group A Columns X,Y,Z have display orders of 1,2,4 and belongs to Group X Group A would be shown first as lowest display order (0) of Group A, is smaller than the lowest dispaly order(1) of Group B. Use of special group name "_head" makes the fileds to apear above the tabs, so they are always visible irrespective of the tab selected. Use of special group name "_foot" makes the fileds to apear below the tabs, so they are always visible irrespective of the tab selected. Display Order The order in which the controls are displayed in the ascending order. Horizontal Position Used when more than one field to be displayed in the same vertical (row) level (i.e. having same display order in the same group). In such cases fields will be displayed left to right in the ascending order of this value on each field. Packing Policy This specifies how the fields are packed horzontally if they share the same display order (see Display order and Horizontal position). Remarks/Tooltips Specify a user friendly remark/tooltip for this field, that would be displayed to the end user when the mouse is hoverd over the label of the field, in form of a tool tip bubble.(You can try it on the demo field edit window shown above, on any of the fields that have "active" label) Listable Specifies wheather or not this field is listed when records are browsed. Listable Specifies wheather or not this field is visible when a selected record is shown. Listable Specifies wheather or not this field is editable when a selected record is shown. Nullable Specifies wheather or not this field can be null. Filterable Specifies wheather or not this field can be used in a Filter to short list records that are displayed during broswe. Filterable fields will be listed when the "Filter" button on the record browse page is clicked. User Guide: ActionsActions provide extension capability to Data Façade. With Actions you can provide custom code that get executed when invoked thru buttons. Actions have 3 different levels of scopes, namely "Global","Record" & "Validation". These will be further discussed under properties of Actions. Similar to DBColumns, Actions are associated with specific DBObject. A action can have set of runtime parameters that would require end user to provide values during execution of the action. There are three types of Actions. 1. Generic Action: In Generic actions administrator has to provide a "Bean Shell" script during the configuration of the action. Optionaly provide a script to generate a lit of runtime parameters. 2. Custom Actions: Developers create a custom java class extending "Action" class and add that to the classpath. This requires a restart of the Data Façade (i.e. restart the hosting tomcat instance) for these action to register. 3. Java Script Action: These are actions that get executed on the Browser Side. Administrator specifies a Java Script during the action configuration. These types are further discussed with samples later. In case of type 1 and 2, the results of the action can be later obtained (by a JSP implementing the "View") via following Session variables. ACTION_MSG: String message set by the action ACTION_ERROR: String Error message set by the action ACTION_ALERT: String Alert message set by the action Actions (type 1 and 2) can have a workflow associated with them. The Action implementation will return a status number, and based on that number you can specify a url (usually a JSP page) to be called to show the out come of the action. This outcome may be show on a seperate window or the same window where the record is shown. Managing Actions 1. Open the DBObject to be managed (or Create a new DBObject and save changes). 2. Click the "Actions" link to open the list of Actions. 3. Pick the Action you want to manage or click "New" to create a new action. Action Properties and their behaviour Once an Action is selected to be modified, properties associated with it are shown in multiple tabs as shown below. Demo/Tryout Action edit window Name Name of the Action. This will be shown to the end user as a button. Description Description of the action. Reference purposes only. Action Class Pick the appropriate action class. Select com.bgs.db.events.GenericAction to pick a generic action and then provide a Java Bean Shell script to implement the action logic. Select javascript to provide a client (browser) side action on which provided java script will be executed. Based on the action class selected, there will be diferent configuration options which would be avialabe after the Action modifications are saved. Note: The dropdown will list all the classes extending "Action" class in the classpath. Some of them are Data Façade specific system actions. Scope Scope of the Action.
Record: Action is associated at the record level, therefore coresponding action button will be placed on the "Detail View" of the record. Detail view is shown after a particular record is selected from the list of records. If the Action requires user inputs before execution, then a new Tab (with the name of the action) will be added to the detailed panel, showing all the input fields for the action.
Global: Action is associated at the DBObject level; therefore coresponding action button will be placed on the top tool bar of the DBObject. If the Action requires user inputs, a dropdown panel will open with all the input fields when the cursor is hovered over the action button. Validation: This actions are not directly visible to the end user. They are usually invoked via client side java script used for field validation. A built-in javascript function "callAction(action_name)" can be used in any field level validation javascript to call this function. Action Type Wheather the action is read-only or not. When an action is marked as Read-Only, endusers do not nead update rights to invoke those actions. If the action type is Default, the action will only be avialable to users with update rights to the DBObject. Display Order Order in which the Action buttons will be shown to the end user. Icon A small image file (.gif or .jpg) may be uploaded to be used as the icon for the action. Confirm Message A confirmation message tobe shown to the enduser upon clicking the Action button, to makesure if the action was intentional. Target Window A window name and it's properties on which the results of the action will be displayed. <window_name>[:<window_properties>] e.g. 1. ResultsWindow:menubar=0,toolbar=0,location=0,status=0,scrollbars=1,width=800,height=800,resizable 2. ResultsWindow Forwarding Used to specify custom views (jsps) based on the status of the action. <status_code>::<view_jsp> e.g. 0::Sucess.jsp 1::WF_1.jsp Failure Page Used to specify custom view (jsp or html) for failures After Saving the "Action" Click "Configure" to open the custom configuration window for Action specific configuration options. Code Samples 1. Generic Action In generic actions, the administrator specifies a Java Bean-shell script to be executed when invoked. This script is specified during the "Configuration" of the action. Following sample, obtains the value of "DEPARTMENT" field populated by the end user, and queries the EMPLOYEES table to get the list of empoyees in that department and send their Ids and Names in the format of id1|id1..idn#name1|name2..namen Note: This is be used as a validation function where after selection of department, the employees of that department will be listed for subsequent select. Note: The validation function (java script) associated with DEPARTMENT field to use the above action, is show below. It sets the List Of Values to the list returned from above action. See "Validation" property for DBColumn. callAction, and setList are built-in convenient Java Script functions.
empList=callAction('GetEmployees').split("#");
empIDs=empList[0].split('|');
empNames=empList[1].split('|');
setList('ASSIGN_TO',empIDs,empNames);
2. Custom Action Custom actions are the java classes written by developer and added to the classpath (Usually jared) of the hosting web server (i.e. tomcat). Custom java classes provides the most flexibility. Following sample, Converts the data represented by the DBObject into an XML. If a Style Sheet is provided in the Action Configuration, it will be applied. 3. Wizard Action Wizard actions are specilized Custom actions. Unlike simple actions, the Wizar Actions have more than one page and end user is guided thru the action states untill finished. Wizard Actions extend WizarAction class. See the API dicumentation for details. User Guide: ReportsData Façade provides simple yet powerfull reporting capability on database tables. A report may be based on a Tabel/View or a SQL statement. Similar to DBObjects, Reports are bundled with the "Application", and made avialable to the end user (with appropriate security) as menu items. During the configuration, the administrator would specify the set of stadard properties and then go thru a configuration wizard. 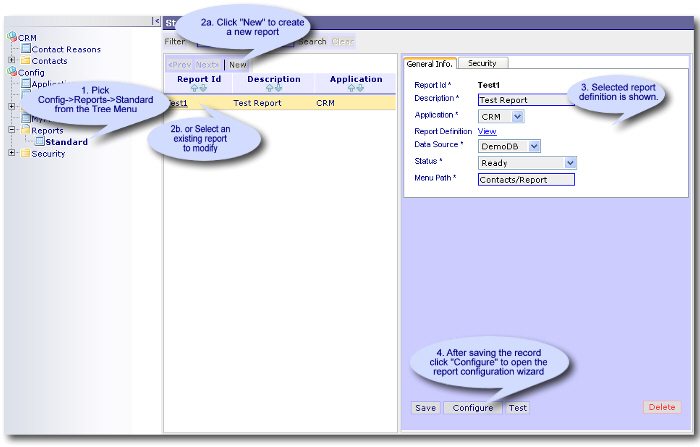 |